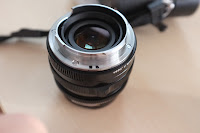
You will find plenty of articles about Leica's 6 bit lens coding system, what it does and how to DIY, I only have the following to add:
There is no need for buying or laboriously printing and cutting templates. All you need is a thin marker, some black nail polish and a toothpick. One more thing: late production Zeiss and afaik Voigtlander lenses have a groove cut in the lens mount which is in the right place and just deep enough to protect the paint from rubbing off. If your lenses are older, you might have to send them to a place that can machine the 6 dots.
First use the thin marker to mark the lens mount on the M8 (or 9) at the 2 ends of the 6 bit sensor. Then mount the lens and mark two dots in the same place on the lens mount. Next, mark a point exactly in the middle of the first 2 dots. "Exactly" is a relative term, but with a bit of care it will be plenty close enough. The 2 sections now remaining can contain 3 dots each. Here's what I mean:
None of the black or blue permanent markers I used worked because they still allowed enough IR to bounce off into the sensor, so the lens type was not detected. Thus, the black nail polish. There is no need to paint white dots, the bare metal will do nicely. Next, practice painting some other metal surface with the toothpick, as the brush included with the nail polish will be too thick. The results can be seen below, the Zeiss C Sonnar 50mm coded as a Summilux 50 pre ASPH, and the Zeiss 28mm Biogon coded as an Elmarit 28mm ASPH. It's not as neat as the original gear, but it's fully reversible, quick and durable.
Enjoy!


No comments:
Post a Comment